29/10/2015

Lord Macragge revisited (Pt. 3, bringing some colour up)

Aha, so as I told you last monday, I've been working a little more on the blue bunch of throne room guys. Still can't show them totally finished, but at least you can see them a little bit better.

You can get the basic shapes here

I went as usual in these cases, from bottom to top. So a dark blue base (a mix of prussia blue and royal blue) and them up and up. The rest was just a matter of adding colours, you know ;)

Well, I hope now you finally get an idea of what I'm trying here!


My idea was adding some contrast, so clear colours, not too flashy, but bright enough to make them look a little bit oldschool, you know.

We're looking ultra-blue

So getting closer and closer to the desired end state

I've realized what I was missing here. A proper banner for the throne room. The Calgar kit provides me solution to that issue though. Working on it, working on it...

26/10/2015

Lord Macragge revisited (Pt.2, bodyguards)

Next step in the vignette. The original one has a bodyguard besides the throne, so I thought I was needing something like that. The choice was kinda obvious, as the modern Marneus Calgar kit comes with two guards:

Yup, I bought these when I was young and reckless


But let me tell, even back in the day I couldn't bear those helmets. Those ugly, ridiculous gull-winged helmets. So in fact this was my perfect occasion to get rid of them. Win-win!! :D

So I replaced the heads with regular helmets and also cut off those axe arms, they look too aggressive. Otherwise, they would look like they were going to attack their boss sitting on his throne! (And we don't want that! We certainly don't want those rumours about a Genestealer Cult infiltrating Macragge go too far!) Unfortunately I didn't keep track of the WIP and I didn't realize until I was priming them. Oh, my bad. This is what I can show you:
 
Brother Stanilus Laureliis

Brother Olivius Hardius
 
As you can see, I repositioned the arms, so they look like standing guards next to their boss. For the first one I chose the 'vigilant bolter' pose (it's the one on the right on the first pic). I severed his full right arm and part of the left one, just below the shoulder pad. I replaced the missing parts with plastics and that was it. I also needed some kind of collar made of greenstuff so the helmet joint looked natural.
I couldn't completely take the right arm out from the second guard (the one on the left on the first pic), but I found this halberd from the Grey Knights pack, so in the end it didn't look that bad.

I currently have them on the painting table, but for the moment you can see then black primed:

Provisional 'bad boys' display. Subject to further changes

Sorry the pics don't really show the work on the minis, but for sure they'll look better when painted. More coming soon!

22/10/2015

Bellator Rex, Warlord Titan

Back to Epic for a moment, while I keep sustaining all the other projects open  :D

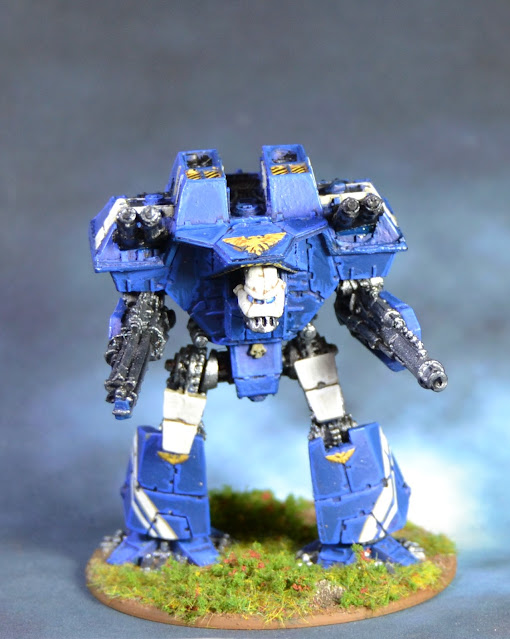
After painting the Imperator Titan, I just needed to put my hands on my Warlord, that was quite a natural step. It's the new model, the one released for 3rd Ed. It for sure goes quite far from the original Warlord design, it's all square, full of rough angles (similar to the metal one that was released, but somehow improved) and in some sense I believe it reflects how different were the guys at GW trying to get from the original models, aiming for a more tech-techy approach (if it's evident for the Imperial designs, you just have to have a look at the Eldar Titans! Wow, those were a change!)

Anyway, I think the Lucius Pattern (as that particular line was later known) works nice on the Warlord. Lucius Pattern Reavers don't look as good to me, but Warhounds were a qualitative leap from the original ones. But I disgress. You are here for the minis, so let's go for that. I stripped the model and started it over again.

Back in black
 
As I had chosen blue as primary colour and white/cream as secondary on my Imperator, the choice was easy here. What wasn't that easy was where to put what. Being that different in concept from the Imperator, I couldn't simply paint random pieces in random colours. I chose this approach:

Mimicking my big brother...
 
Then I thought of adding a couple of white stripes on the blue background. That would be respectful with the scheme and also would emphasize the more industrial/modern feeling. After that and a couple of other pieces in white, this is the final result:
 
Yeah, I'm wearing an Adidas sweatsuit

Neighbourhood's mine, bro

See me walkin'

 A beast like this needs a name in accordance. I chose Bellator Rex, 'Warrior King'. Being a Warlord, this Titan will lead most of the offensives of the Legio, the Imperator taking part only in the most desperate battles. Here you can see both brothers:
 
Blues Brothers... I mean... Blue Brothers


Well, so now I have two Titans. Still far from an operational battlegroup, but you can bet I'm working on solving that... ;)

19/10/2015

Lord Macragge revisited (Pt.1)

New crazy project! Once again a product of my mental scattering :D

Those of you who know the latest edition of the Space Hulk game will be familiar with this mini:


Man, is that bus coming?

It's a perfect objective marker for the game, sure, but what I saw was this other thing...

You saw this HERE
 
 You know, that's my lateral thinking... Don't ask, there is no rational explanation. I just knew I had to do this. Sooo, in order to update the vignette, first thing you need to do is removing some expendable stuff.
Thousand of blood drops and other Blood Angels stuff!
 
From them it all was a matter of getting the right bits into the right places. So you know, greenstuff all over, a suitable head... Hardest thing for me was finding a right hand power fist. I have plenty of left handed ones, but not a single right handed one! I finally had to get one from Space Crusade:
Now beginning to look like something
 
However I wasn't getting the right vibe for the mini. It lacked some quality and I wasn't getting it to the point I was looking for. I finally had to assume I was in need of drastic measures. I had to desecrate the modern Marneus Calgar mini (you know, the one in the Terminator armour).
This is how he's gonna look in the end

I took the right shoulder pad and the ammo belts for the bolters. At this point I could then as well used his head or his right arm, but you know, that mini is much more aggressive, the guy is charging through the battlefield, so his fists are clenched and he's shouting. I needed quite the opposite, a relaxed attitude, so I just used these bits and that was all.

So this is it for the moment! I have the centerpiece, the boss, but I will need some more people for the vignette ;) I'm working on it, you'll see what I'm getting in a few days...

13/10/2015

More skellies!

Time to start the next phase of my insanely long term plan about HeroQuest (Stage 3, I believe?)
I'm adding a few modern (but old style looking) minis to my ranges. Not sure if adding, replacing or whatever, I only know I saw these Otherworld Skeletons and I knew I wanted them:
 
You came to the wrong neighbourhood, dungeon thief!

I'm so gangsta I even wear a hoodie

 
Not that this is much of a show, but these minis are quite lovely to me. In fact, I've felt the unsettling desire of building up an Undead force. No purpose at all, just the mere thought of oh, how nice would it be having a horde of skeletons. The 'ooh, shiny' effect, I presume.
 
If I ever dare, here it is the beginning


For the moment they are just for HeroQuest. Only future will tell what else can happen...

09/10/2015

Mike the scribe

Despite the lack of updates over here, I'm still a busy bee :). Well, most of the time I'm just changing diapers or rocking the little Suberling, but when not doing that, I'm trying to give shape to too many a few projects.
What I can show today is another Otherworld conversion. While wandering through their web I met this mini:
Pic shamelessly stolen
That face immediately reminded me this other scribe:
 
You know, the guy who wrote the Quixote and stuff

 
 Sooo, it all took its place in my mind. The conversion was quite self-explanatory:
 
No way I could sculpt the ruff

No, I don't believe in ebooks, you brat

 
Please let me introduce Mike Zerbantz, scribe and novelist. Quite a life indeed. After being declared a fugitive on his homeworld (apparently he severely injured someone relevant in a duel), he enlisted so he could flee from home. Being part of a Navy landing party on board of the Frigate Iron Marchioness, during the battle of LePanth he got badly injured on his left arm, which had to be replaced with augmetics.
After the victorious campaign, when the fleet was going back to their docks, Zerbantz's convoy was attacked by Eldar pirates and he was taken prisoner. His life in captivity was pretty unbearable. For five endless years he was tortured an tried to escape, until he was finally rescued by the Ultramarines Chapter on a memorable raid.
Finally settled on Imperial soil, he found himself totally ruined and got himself into some schemings on the edge of law to survive, while at the same time he begun his writer career based on his experiences.
Sometimes employed by Administratum or local authorities as hired workforce to help with accounting or logistics, he's lately been seen at Besenval, researching for his latest novel, something about a guy who apparently goes nuts and believes himself to be a Space Marine or something and begins his own crusade through the stars.


You would also look grumpy if you had lived what I lived, son

My bionic arm squeaks a little today

Well, not much else to say really, this was a mini mainly just for fun, I couldn't resist, hehe.
I'm currently working on some quite different stuff, but I'd like to finish something before I dare to show pics, or at least I'd like to have some real progress to show. Be patient, my friends, ye shall be rewarded...

01/10/2015

Besenval Port. Stage 3. Urban expansion

This has taken ages, but I have finally come up with something. I was in severe need of a new board for my Besenval port ambientation. I esentially used the same technique I used for my previous board (Here and here), i.e., lots of foam:
 
Back again!
 
Its another 120 x 60 cm (4' x 2') plyboard surface to cover, once again thinking in some water involved, stairs and stuff.
 
I'm going for simpler shapes this time

 
Though I enjoyed the first board, it drove me nuts. I went for simple surfaces able to hold lots of buildings while being minimally interesting. What really got me exhausted last time was carving the whole pavement piece by piece. Brrr, I still shiver whenever I remember it...

I found this easier solution:
 
Witchcraft!!

 
The use of this kind of template just made this achievable. But beware, it has pros and cons. Though being a quick way of making all that pavement, you have to be careful when pressing the mould. The thing is that you should apply enough pressure to 'carve' the foam (so you will need something like a rubber hammer), but you have to be gentle, or you take the risk of leaving crude hammer marks on your terrain. I really didn't get the knack, so my work here looks a little rough. I guess it's nice to try some surface first so you get familiar with the tools before you go for the actual stuff.

Anyway! This is what I got in some reasonable time:
 
Weeee!!
 
Last time I used priming spray, as it was the quickest solution. I found a nice spray for that, but let's assume it, no matter how good it is, it's gonna devour your foam and ruin the work to some point. As I had saved some time in the process here, I thought I could invest it on properly painting this piece with a brush.

Going oldschool!!

Some weeks later I finally got this:
 
Another piece of port

 
I'm not happy with the quality of this board. I sacrificed proper handcraft for the easy way. So the cobble looks rough and the paintjob is not uniform. On a second thought, I think I should have sticked up to the spray plan; that way colour would have been regular all over and would have fitted with the other board. Montana 94 sprays were good enough for my purposes.
But well, all those are lessons learned! I'll take that into consideration whenever I dare to do more boards!

Here you can see the two boards together:
 
They could be placed in other configuration, but I forgot to take a pic.
 
And this is how they look with some buildings on them:

120 x 120 cm board. This begins to look like what I had in mind

Sooo, now I have more room for more buildings! And more dwellers! Yay!

It's shabby, I know, I know, but it's enough for my skills (specially given my current life circumstances) and more important, it's enough for my needs! I'm really looking forward to play something here!